Handling Orthodontic Dental Emergencies
At Stellar Smiles Ortho, we want to be there for you every step of your treatment so you can be as comfortable as possible while achieving the smile of your dreams. We understand that you may have a few accidents or emergencies on the journey to your stellar smile. Generally, there aren’t many times where an orthodontic issue is truly an emergency, and they can typically be taken care of at home.
Whenever one of these situations happens, there is no need to worry. Our team is ready to help you and ensure that your treatment carries on without any issues. While we are happy to tend to these emergency situations as quickly as we are able, we know there is often some discomfort in the moment. There are a few tips and tricks you can use to feel more comfortable in the face of an accident so that you don’t have to deal with any pain leading up to an emergency appointment. Depending on the area of your mouth affected, you can use a combination of these methods to temporarily address the issues.
3 Categories of Scheduling
This is NOT and emergency and you can be seen at your regular visit.
Schedule for COMFORT visit at designated times within a week.
Schedule for COMFORT visit at designated times asap.
Non-Emergencies
General Soreness (Discomfort) or Toothache
While you are getting used to your appliance or your teeth begin to shift into place for your perfect smile, you may feel some pain or discomfort as you adjust. This is completely normal and generally doesn’t last very long. We encourage soft foods if eating is uncomfortable. That being said, we don’t want you to feel uncomfortable for a prolonged period of time. If the soreness doesn’t go away quickly, we suggest taking any over-the-counter pain medicine. Other helpful remedies include gargling salt water or holding a warm washcloth to your jaws to soothe the pain.
This is NOT and emergency and you can be seen at your regular visit.
Mouth Sores
Some patients are susceptible to episodes of mouth sores. While braces do not cause them, they may be triggered by an irritation from braces. One or several areas of ulceration of the cheeks, lips or tongue may appear. Prompt relief may be achieved by applying a small amount of topical anesthetic (such as Orabase or Ora-Gel at your local pharmacy) directly to the ulcerated surface using a cotton swab.
This is NOT and emergency and you can be seen at your regular visit.
Irritation of Lips or Cheeks
Sometimes new braces can be irritating to the mouth, especially when eating. A small amount of non-medicinal relief wax makes an excellent buffer between the braces and mouth. Simply pinch off a small piece and roll it into a ball the size of a small pea. DRY THE BRACE AND THE WIRE. Flatten the ball and place it completely over the area of the braces causing irritation. You may now eat more comfortably. If the wax is accidentally ingested, it’s not a problem. The wax is harmless.
This is NOT and emergency and you can be seen at your regular visit.
Braces/Appliance Emergencies
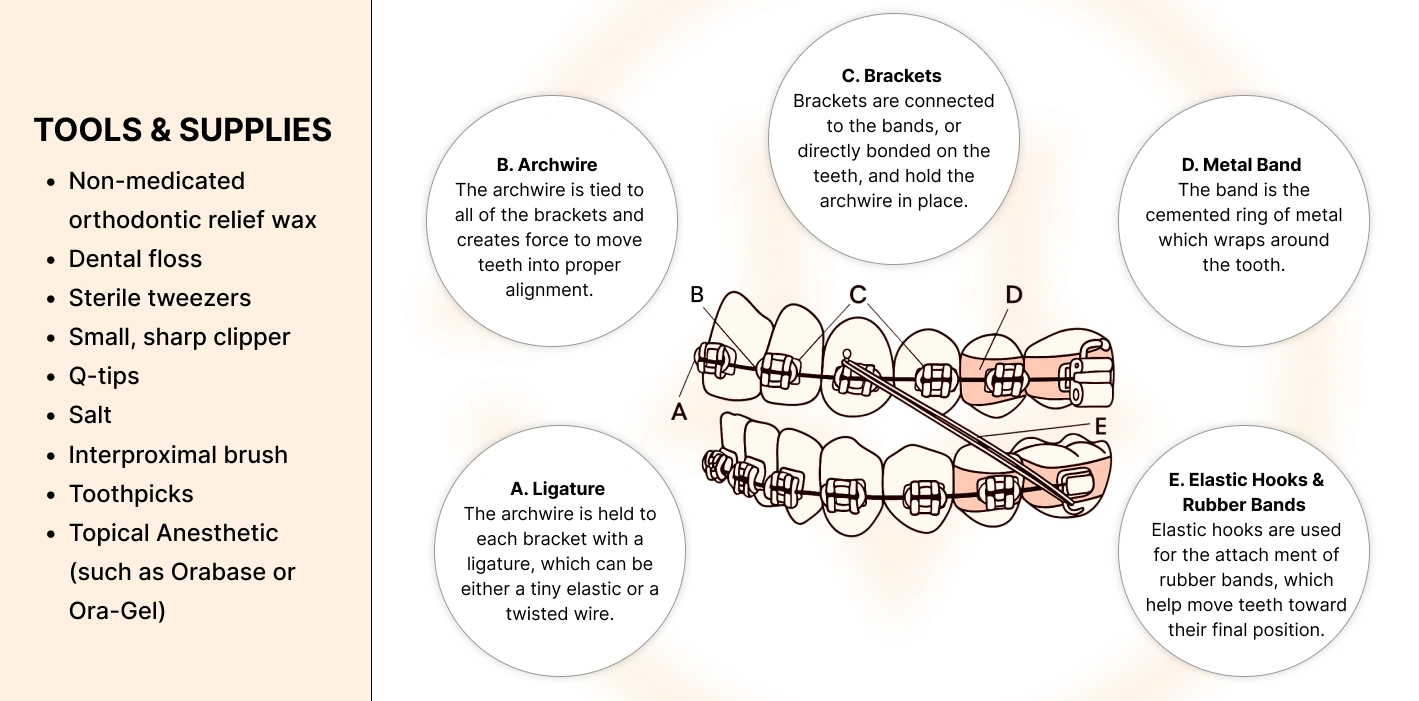
(Color) Ligatures Came Off
Small round rubber bands or small, fine wires, known as ligatures, hold the wire to the bracket. If a rubber ligature should come off, you may be able to put it back in place using sterile tweezers. If a rubber or wire ligature comes loose, simply remove it with sterile tweezers. If the wire ligature is sticking out into the lip but is not loose, it may be bent back down with a Q-tip or pencil eraser to eliminate the irritation. Be sure to examine all ligatures.
This is NOT and emergency and you can be seen at your regular visit.
Loose Spacer (little blue rubber band)
Spacers are small rubber rings between your teeth to make space for bands to fit around your teeth or to help move teeth. They are usually left in place for a few days before placing braces on your teeth. If your spacers move out of position or fall out entirely, no need to worry! It means you have enough space and that’s a good thing.
This is NOT and emergency and you can be seen at your regular visit.
Loose Bracket (Still Attached to Wire)
If the loose bracket has rotated on the wire and is sticking out use sterile tweezers to slide or rotate the bracket along the wire until it is comfortable. Cover the area with orthodontic wax.
Schedule for COMFORT visit at designated times within a week.
Protruding (Poking/long) Wire
Occasionally, the end of a wire will work itself out of place and irritate the patient’s mouth. Use a Q-tip or pencil eraser to gently nudge the wire so that it is flat against the tooth. If the wire cannot be moved into a comfortable position, cover it with relief wax. (See Irritation of Lips or Cheeks above for instructions on applying wax). In a situation where the wire is very bothersome you may clip the wire. Use a folded tissue or gauze around the area. Use a pair alcohol sterilized sharp clippers (cuticle cutters or nail clipper) and snip off the protruding wire and grab with paper/gauze. Relief wax may still be necessary.
Schedule for COMFORT visit at designated times within a week.
Loose Bracket (Came Off Wire)
If the bracket broke off and the bracket can be easily removed, bring it to your orthodontist in a plastic baggie.
- If NOT the front of mouth bracket and DOES NOT attach to rubber bands:
- Schedule for COMFORT visit at designated times within a week.
- If it as a bracket that attaches to a rubber band:
- Schedule for COMFORT visit at designated times within a week.
- If it is the front of mouth (Upper + Lower 4 front teeth) bracket:
- Schedule for COMFORT visit at designated times asap.
Loose Band
Bands are the metal rings that fully surround your back teeth. If you feel a band has come loose and is still attached to the wire try to chew on the other side until you see your orthodontist.
- If band DOES NOT attach to a rubber band and IS NOT part of an appliance:
- Schedule for COMFORT visit at designated times within a week.
- If band attaches to a rubber band:
- Schedule for COMFORT visit at designated times within a week.
- If band is part of an appliance:
- Schedule for COMFORT visit at designated times asap.
Appliance Examples: (Hyrax Expander, Nance, Bite Plate, Herbst, Lower Space Maintainer, Lingual Holding Arch)
Loose Specialty Appliance – Forsus, Herbst
If the spring of a Forsus Distalizer or Herbst appliance comes loose save all the parts on a plastic baggie.
Schedule for COMFORT visit at designated times asap.
Brace/Appliance/Wire Swallowed
Stay calm and go to the Local Emergency Room. Get a written report and x-rays and bring to your Orthodontist.
Schedule for COMFORT visit at designated times within a week.
invisalign® Emergencies
invisalign® Emergency #1: Sharp Aligners
Discomfort and irritation can occur on your gums and cheeks if your aligners have a slightly sharp area of plastic along the border. To fix minor sharp spots on your aligners, you can use a clean emory board. Smooth over the sharp spot just a little at a time until its is again comfortable. If you have developed a sore inside your mouth from your aligners, rinse the area with warm salt water to clean the sore and to help it heal.
invisalign® Emergency #2: Broken Attachments/Buttons
In some cases, the attachments/buttons on your teeth can break off. The attachments work like mini-handles helping the aligners move your teeth and the buttons are for elastics. Don’t look for the attachment or the button. Don’t waste your time digging through your meal or attempting to search the floor for it. We will put a brand new one.
This typically doesn’t make for an orthodontic emergency, and you should keep wearing your aligners until we can schedule you back in. If you are wearing elastics on both sides – keep wearing them on the side that is intact.
invisalign® Emergency #3: Cracked Aligners
While it is uncommon due to the durable material of your invisalign® trays, they can sometimes become cracked or chipped if they aren’t handled properly. Cracking or chipping can be a result of mishandling, dropping them, or forgetting to remove them before eating.
In most cases, having cracks in your invisalign® isn’t a big cause for concern. If you do notice some damage on the surface, you should take extra care in how you handle them, particularly when you’re putting them in or removing them. A good way is to remove the aligners using the side that’s opposite to the crack. Continue wearing your aligners as directed if you’re able to.
If the crack becomes worse and the aligner is no longer useable, please move to the next one and send us a picture so we can make sure the fit is good. We then can advise you if you need to make an earlier appointment.
invisalign® Emergency #4: Lost Aligners
If you do lose one of your trays, you can act fast to keep yourself and your treatment plan on track. Find your most recent/previous set and wear those until you’re able to call us. We can then order a replacement aligner from invisalign® and for pickup.
Please remember to store your aligners in their case as they are easy to lose track of, accidentally throw out, or leave behind at a restaurant.